1st group learning on observability for testers done! We looked at cloud computing, containers, CLI & creating an AWS instance. Next step: build the observability stack. Thanks mentors @a_bangser @trisha_1212 @Parveen_Khan10 @lisacrispin @RanjaniRambles
— Anne-Marie Charrett | Physically Distant (@charrett) June 4, 2020
Steps we followed :
- Create an account on AWS - https://aws.amazon.com/resources/create-account/
- Installed AWS CLI by using this link - https://docs.aws.amazon.com/cli/latest/userguide/install-cliv2-windows.html
- Run the following command on the command line to check if it's installed
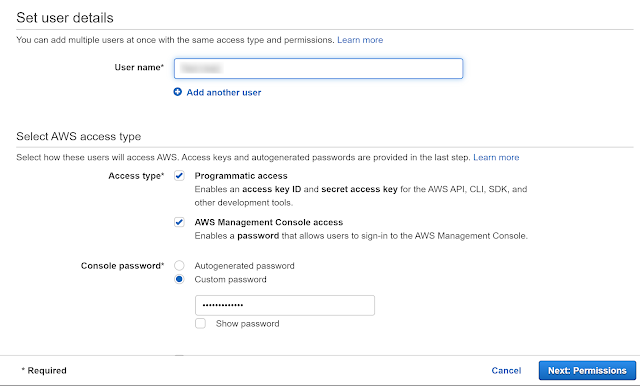
- The next step was to create IAM user. Identity and Access Management(IAM) enables you to manage access to AWS services and resources securely. Using IAM, we can create and manage AWS users and use permissions to allow and deny their access to AWS resources. An IAM user with admin permissions is not the same thing as the AWS account root user. We need to follow 4 steps to create this user.
Step 1

Step 2
Step 3
Step 3 is optional, we could add the tags and use that as an identifier. It helps keep track of how the resources are being used. It also helps to organize, track or even control the access fo the user. And step 4 is to review the information added and then create the user.
- Create an AWS access Key ID and Secret Key ID for the user we just created by following this - https://console.aws.amazon.com/iam/home#/security_credentials
- Install docker and confirm if it's installed by running the following command.
- Install docker-machine. Docker machines allow us to create Docker hosts on cloud providers like Azure or AWS. I'm using windows so I used the following command by going to Git Bash. If you using Mac then follow this link for the right command - https://docs.docker.com/
machine/install-machine/
Learning as a group was a very collaborative and fun way to learn, share and tackle the challenges along. After having this session I'm already looking forward to the next session to go through the next steps.

